Table of Contents
Open Table of Contents
Intro
When it comes to building any production application, having a reliable backup strategy is an absolute necessity. Through my work at Ostrich Cyber-Risk, I’ve gained valuable insights into the corporate landscape and learned the importance of compliance documentation such as SOC2.
SOC 2 compliance mandates the implementation of a robust backup strategy. In fact, one of their criteria states, “The entity must authorize, design, develop, implement, operate, approve, maintain, and monitor environmental protections, software, data backup processes, and recovery infrastructure to meet its objectives.”1 It’s all about covering your bases!
Now, if you’ve had experience with building apps using serverless architecture, especially if you’ve found this article, chances are you’re familiar with Google’s Firebase, which includes a powerful noSQL database called Cloud Firestore. In this tutorial, we’ll take you step by step to extend Cloud Firestore’s default backup functionality. With the latest Google Cloud Functions, you’ll be able to effortlessly back up your data to a Google Storage bucket, all while keeping your architecture serverless and scalable.
Create a Data Storage Bucket for Backups
First, login to the Google Cloud Console and choose ‘Storage’ from the side menu.
Next, click on the ‘Create’ button next to the ‘Buckets’ header. You’ll be asked for a unique name for your new bucket - remember that this must be unique across all of Google Cloud Storage.
Choose the appropriate storage class and location for your needs, then click ‘Create’. You now have a dedicated space to store your Firestore backups.
In case anything has changed from my directions or you need further guidance, please refer to the Google Cloud Storage documentation.
Create a Cloud Function to send the Firestore data to the bucket
Now that you have a bucket to store your backups, you need to create a Cloud Function to send the data to the bucket.
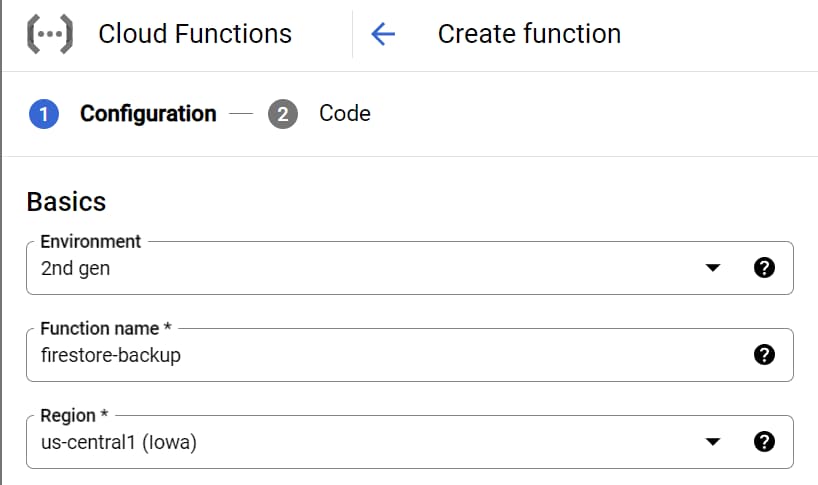
In the Google Cloud Console, click on the ‘Create Function’ button.
Give your function a name, and choose the appropriate region. Environment should be defaulted to 2nd gen, since this will be an updated v2 Google Cloud function. For this tutorial, I chose ‘us-central1’ as my region.
Under Trigger, choose ‘Add Trigger’, then in the Select a Cloud Pub/Sub topic dropdown, create a topic.
The name for this topic doesn’t need to be unique, so use something like firestore-backup-trigger or firestore-backup-topic. Accept the defaults for everything else, then create and save the trigger.
Nothing needs to be modified in the Runtime, build, connections and security settings section.
When you click next, you’ll be in a code editor environment. The following code is for a Node.js Runtime. You should be able to use the latest version. At the time of writing, this was Node.js 20. This contains the content for both index.js and package.json.
Use the following, substituting in your bucket name, project id, and modify the entry point value to firestore-backup or whatever value you choose as the first parameter for functions.cloudEvent.
// index.js
const functions = require('@google-cloud/functions-framework');
const firestore = require('@google-cloud/firestore');
const client = new firestore.v1.FirestoreAdminClient();
const bucket = 'gs://[bucket-name]'
// Register a CloudEvent callback with the Functions Framework that will
// be executed when the Pub/Sub trigger topic receives a message.
functions.cloudEvent('firestore-backup', cloudEvent => {
    const databaseName = client.databasePath(
        "[project-id]",
        '(default)'
    );
    return client
        .exportDocuments({
            name: databaseName,
            outputUriPrefix: bucket,
            // Leave collectionIds empty to export all collections
            // or define a list of collection IDs:
            // collectionIds: ['users', 'posts']
            collectionIds: [],
        })
        .then(responses => {
            const response = responses[0];
            console.log(`Operation Name: ${response['name']}`);
            return response;
        })
        .catch(err => {
            console.error(err);
        });
});
// package.json
{
"dependencies": {
"@google-cloud/functions-framework": "^3.0.0",
"@google-cloud/firestore": "^1.3.0"
}
}Then you’re set to deploy the function. Click ‘Deploy’ and wait for the function to be created.
Create a Cloud Scheduler Job
Now that you have a Cloud Function to send the data to the bucket, you need to create a Cloud Scheduler job to trigger the function on a regular basis.
In the Google Cloud Console, click on the ‘Create Job’ button.
Define the schedule
Give your job a name such as run-firestore-backup, and choose the appropriate region. For this tutorial, I chose ‘us-central1’ as my region. For the description, I like to put ‘This topic runs x’, where x is the url for the cloud function we just created, just so I have a link between the two that is readable.
For the frequency, choose whatever frequency and time zone you like.
I use 0 0 * * * which is every day at midnight.2
Configure the execution
In the target type dropdown, choose ‘Pub/Sub’. In the topic dropdown, choose the topic you created earlier.
The message body cannot be left blank, so you can leave another note to yourself about what this job does, linking to the cloud function again.
The defaults for everything else should be fine, so click ‘Create’ and you’re done!
This should take you back to the Cloud Scheduler page, where you can see your new job. You can click on the job to see the details, and you can click ‘Force Run’ under the actions menu button to test it out.
Footnotes
1. Backup.ninja - Data Backups for SOC 2 Compliance
2. Google Cloud Scheduler - Cron Job Format